In New Zealand, hard hat safety is governed by specific standards to ensure the protection of workers in various industries.
Hard hat safety in NZ
In New Zealand, failing to comply with health and safety duties, including not wearing a hard hat when required, can result in significant penalties under the Health and Safety at Work Act 2015 (HSWA). The penalties vary depending on the nature of the offence and the type of duty holder involved.
Here are some key points:
- Reckless Conduct: If a duty holder is found to be reckless about the risk of injury, illness, or death, they can face severe penalties, including imprisonment.
- Failure to Comply with a Duty: If the failure to comply with a duty exposes an individual to a risk of serious injury, serious illness, or death, this can also lead to substantial penalties.
- Infringement Notices: For specified offences against the HSWA or regulations, infringement notices can be issued, requiring the payment of an infringement fee, or allowing for an appeal in court.
- It’s important to note that the exact penalties would depend on the specific circumstances of the violation and the outcomes of any legal proceedings. For detailed information on the penalties, it’s advisable to consult the HSWA or speak with a legal professional.
Head protection is a vital piece of PPE!
Hard hats are the main piece of head protection that protects us from potential brain damage or other head injuries that result from the impact of being hit by falling, moving, protruding, or flying objects. They also protects the head from electric shock and weather extremes, such as UV exposure/sunstroke.
How do they protect you?
Constructed with an outer shell designed to deflect or absorb an initial impact and suspension/harness inside, which absorbs and spreads the impact, hard hats minimise the effects of a blow to the skull. Some hard hats have a chinstrap, ensuring the helmet does not fall or blow off.
Wearing hard hats correctly
To provide maximum protection, hard hats must be fitted correctly and worn according to the manufacturer’s instructions. It’s important to adjust the harness cradle for comfort and ensure total contact with your head at all times. Clothing items should not be worn underneath the hard hat as they can make the harness cradle ineffective. Use the chin strap when wearing at all times.
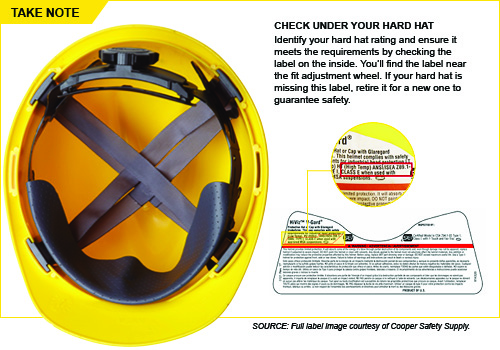
Compliance with standards: Hard hats must comply with the standard AS/NZS 1801:1997 (or equivalent) and should be worn at all times on sites where there is a risk of objects falling from above.
Mandatory use: The use of hard hats is becoming mandatory on most sites across New Zealand.
Types of hard hats: There are different styles of hard hats available for various types of work, including industrial, working with animals, bump caps, chainsaw use, ATV riding, high temperature, bushfire fighting, peakless, peaked, and full brim.
Attachments: Some hard hats allow for the attachment of accessories like face shields, respirators, hearing protection, and work lamps.
Maintenance
Hard hats should be stored in a cool, dry environment away from direct sunlight and heavy or sharp objects.
- They should be kept away from chemicals and cleaned regularly.
- Store in a clean, dry area, away from direct sunlight.
- Inspect your head protection at least weekly – check for cracks, frayed straps, dents, penetrations, and any other signs of damage. You may want to check with the manufacturer’s instructions for inspection.
- Replace immediately if you notice any signs of damage or wear.
- Always remove and replace a hard hat if it sustains an impact, even if damage is not noticeable.
- Clean by scrubbing, immersing in warm, soapy water and rinsing in water.
- A simple test you can do is squeeze the sides of the hard hat together and listen and feel for signs of cracking or stress.
- Your hard hat should be replaced three years after first use or five years after the manufacture date. Some suspension components may need to be replaced at intervals no longer than two years. CHECK THE DATE OF YOUR HAT. RECORD YOU HAVE CHECKED IT.
Training to use your hard hat
That’s right – you must ensure your workers are trained in the safe use, storage, care and maintenance of the hard hat. This may include:
- The hazards the hard hat may control and use for that risk
- The correct way to fit, adjust the hard hat for comfort, and use the hard hat
- How the hard hat works, its construction and the limitations of hard hats
- Instruction on which tasks require the use of a hard hat and why it must be worn
- Correct storage, cleaning and identifying of damage or wear of the hard hat
- When to replace the hard hat, regular inspections recorded
Purchasing hard hats
For purchasing hard hats or related safety equipment, you can visit your safety store. Additionally, New Zealand specifies that all hard hats must comply with New Zealand or equivalent international standards to be used in NZ.
Remember, wearing a hard hat is not just about compliance with regulations; it’s a crucial practice to protect oneself from potential hazards on the job. Always follow the manufacturer’s guidelines and check with them if you have any specific questions about your hard hat.
IF IN DOUBT, THROW IT OUT.
Written by Debbie Robertson from Rural Safe
Published in WIRED issue 73/JUNE 2024 by Fencing Contractors Association NZ
Read WIRED online
Follow us on Facebook
© Fencing Contractors Association NZ (FCANZ)