In some areas, slightly different laws apply to employees under the age of 18 compared with adult employees.
Employment agreements
The same fair bargaining rules for employment agreements apply to both young people and adults.
Young persons aged under 18 years can sign an employment agreement but it’s important that they receive help when agreeing to new terms and conditions. Potential employers must also provide a copy of the agreement to the intended employee, and give them the opportunity to take it away and get advice on the terms.
All employees have the right to representation when dealing with their employer and they can choose anyone they want to represent them. Parents can be with their child when discussing employment matters with their employer.
Record the employee’s age in wage and time records
As for all employees, an employer must keep accurate wage and time records for young employees. In addition, if the employee is under 20 years of age, the employer must also record the employee’s age in these records.
Minimum wage
There is no minimum wage for employees under the age of 16.
Young employees aged 16 to 19 years can be paid a different minimum wage than adult workers, if the starting-out wage applies.
The current minimum wage rates (before tax) are as at 1 April 2023. They apply to employees aged 16 years or over.
| Type of minimum wage | Per hour | 8 hour day | 40 hour week | 80 hour fortnight |
| Adult | $22.70 | $181.60 | $908 | $1,816 |
| Starting-out | $18.16 | $145.28 | $726.40 | $1,452.80 |
| Training | $18.16 | $145.28 | $726.40 | $1,452.80 |
Restrictions on hours worked
If you employ any school-aged students (under the age of 16), their work hours must be outside of school hours only and in addition must not be between 10 pm and 6 am, including in times that interfere with the student doing school work.
It is unlawful for businesses to employ school-aged students during school hours under the Education and Training Act 2020, unless they have a certificate of exemption. Failure to do so can lead to fines up to $1,000 for both the parents and the employers.
Using tractors or other vehicles
An employer, or someone hiring a contractor must make sure that any worker under 15 years does not:
- drive any tractor and any vehicle, other than a car, truck, motorcycle or machinery that weighs 700 kilograms or less
- ride on any vehicle when it’s towing or is attached to anything
- ride on anything towed by or attached to any vehicle.
An employee must have a current driver’s licence before driving any motor vehicle on a road. A road includes any car park, yard, or other part of a workplace which has public vehicle access.
There is a special exception for the agricultural sector which allows young people doing contract work who are over the age of 12 years to use tractors for agricultural work provided they are fully trained or being trained, or they live on the property.
Age restrictions on where a young person can work
Employees under 14
An under 14-year-old cannot work as a babysitter, au pair or nanny without adult supervision because it’s an offence to leave any child under 14 unsupervised.
Employees under 15 years
An employee or contractor who is under 15 years cannot work:
- on a logging site eg a forest where trees are being cut down or processed
- on a construction site
- in any area where goods or hazardous substances are being manufactured
- in any area where the work requires lifting heavy weight
- in any area where the work being done is likely to harm the employee
- with any machinery or assist work with any machinery.
These restrictions also apply to people under 15 years visiting the workplace. They don’t apply if the employee works at all times in an office in that area, or in any part of that area used only for selling goods or services. They don’t apply to visitors who are under direct adult supervision, on a guided tour or are in areas open to the public.
Employees under 18 years
An employer cannot employ anybody aged less than 18 years to work in:
- any restricted area of a licensed premises while that area is open for the sale of liquor, unless they are employed preparing or serving any meal, cleaning, repairing, maintaining, altering or restocking the area of any equipment, removing or replacing any equipment, stocktaking, or checking or removing cash
- direct access to gaming machines in gaming venues such as bars, taverns and clubs where a gaming machine society has obtained a licence to operate gaming machines
- sex work.
Employees under 20
Under 20-year-olds can’t work in parts of casinos where gambling takes place, or undertake any gambling-related duties.
Settlement agreements
People aged 16 or 17 years may sign settlement agreements to resolve a dispute with an employer. These agreements will still be final and binding.
Checklist for employers
Before your young employee starts
- Give them a start date and time.
- Give them information they will need to know before starting.
When your young employee starts work
- Give them a copy of their employment agreement.
- Get their contact details and give them yours and/or their supervisor’s contact details.
- Get their tax number and ask them to fill in tax forms.
- Get their bank account number for payment.
- Record their age in your wage and time records (this is a legal requirement if they are under 20 years).
- Introduce them to their workmates and supervisors, and explain their roles.
- Explain what is expected of them with regards to workplace behaviour.
- Advise them of hazards in the workplace and how to avoid being injured.
- Advise them what to do in case of an emergency and show them where safety equipment is located.
- Provide them with personal protective equipment (PPE) (if applicable).
- Provide them with a uniform (if applicable) and explain the company’s dress code.
- Provide them with training on how to do the job, taking into account their lack of working experience.
Article reproduced from Employment New Zealand
www.employment.govt.nz

Published in Business, Health & Safety, Environment in WIRED Issue 71 / December 2023 by Fencing Contractors NZ
Read WIRED online
Follow us on Facebook
© Fencing Contractors Association NZ (FCANZ)


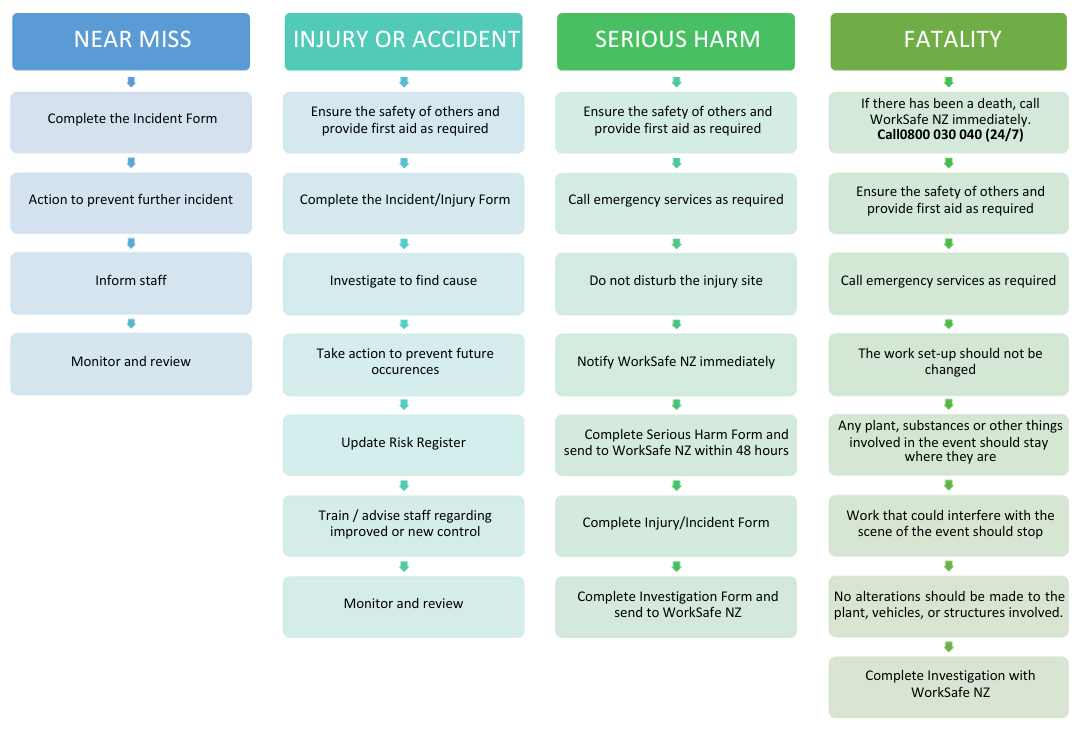 What guidelines do