In our sixth instalment of our retaining walls feature, Nick Liefting continues to take us through the complexities of Gravity Walls.
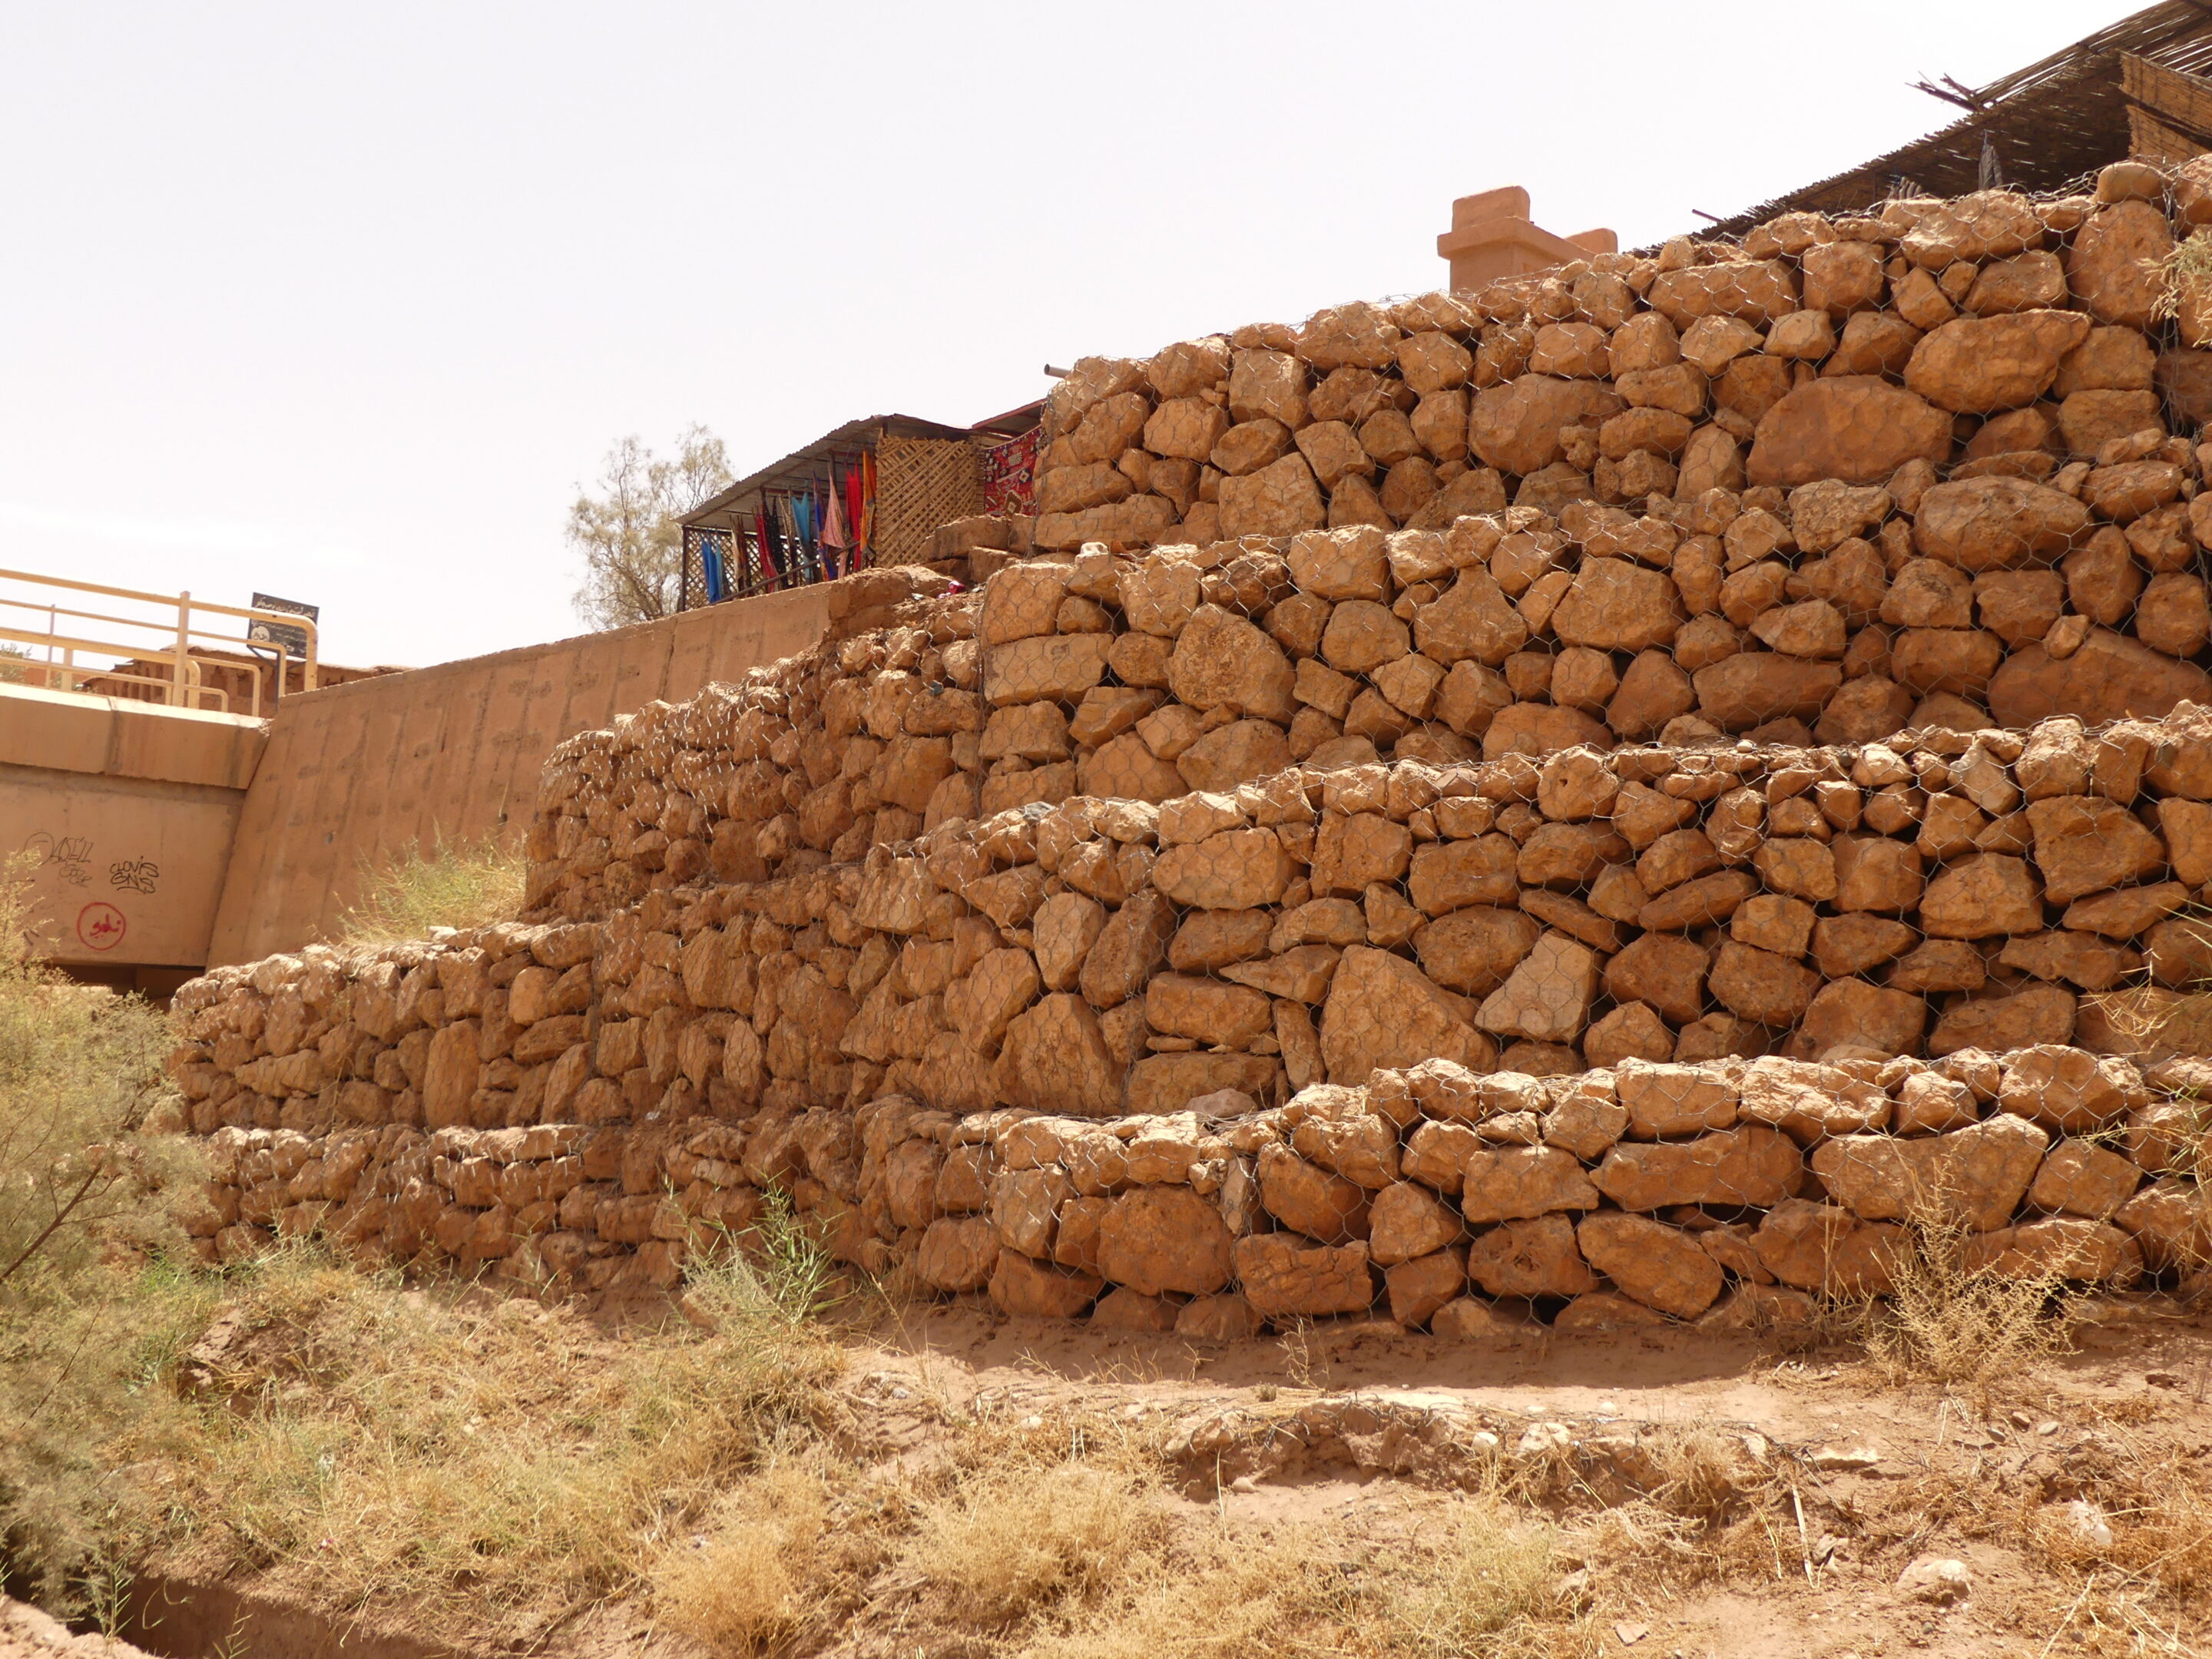
Gabion Wall
The word Gabion, is derived from the Italian word gabbione, meaning big cage, also Italian gabbia and Latin cavea, meaning cage. It is precisely that, a basket or container filled with earth, stones, or other material and used for the purpose of holding back earth of different levels.
The Gabion wall is the oldest retaining system known to man, as they were used to protect the banks of the Nile River in ancient Egypt over 7000 years ago, and they’re still used today by Civil Engineers all around the world as an incredibly effective and efficient retaining wall. In the Middle Ages, gabions were used as military forts. In earlier history, Civil Engineers have extensively used gabions for stabilisation of banks, coasts, highways and erosion control of slopes.
Early gabions were round cages with open tops and bottoms, made from wickerwork and filled with earth. Obviously, gabion walls were a popular form of construction prior to the advent of the machinery we have today. i.e., excavators, drilling and piling rigs. The only resource available then, was manpower.
Today gabions are constructed using either woven wire or welded mesh baskets.
Application
Gabions are generally used:
- Where there is difficulty drilling or driving piles
- For coastal protection
- Where height is required, i.e. beyond what a cantilever wall can do
Types of baskets
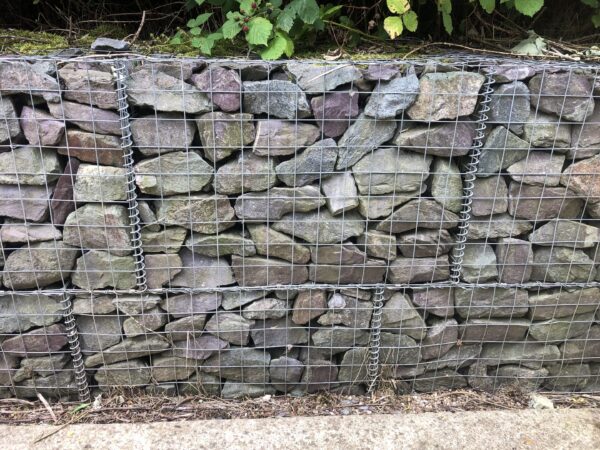
There are two main types of baskets:
- The first is a hexagonal woven mesh which comes either galvanised or galmac, which is galvanised and PVC coated. They come in sizes; 2.0 x 1.0 x 1.0 and 1.0 x 1.0 x 1.0.
- The other is a galvanised welded mesh with a 75mm aperture
Foundation
Because there is a high loading on the ground, particularly when the wall is increased in height, a secure foundation must be installed.
The two types are:
- 150mm thick compacted hard-fill or
- 150mm thick concrete with two layers of reinforcing mesh
A 1.0m high wall exerts 1.60 Tonne per square metre onto the foundation.
The foundation is excavated to a depth so that the base of the basket will be approximately 100mm below finished ground level.
The width of the foundation is two-thirds of the wall height, e.g. if the wall is 3.0m high, the base basket is 2.0m wide; 6.0m high, 4.0m wide. Also, allow 200mm at the front and back of the basket – this helps when aligning the baskets and provides a place for the drain-coil to sit.
Gabion walls can and are often used where the ground conditions are soft, where drilled holes either collapse or fill up with water, and with driven poles the ground is not strong enough to cater for the horizontal forces applied. To give the gabion foundation extra founding strength, piles can be driven and the concrete foundation constructed on top. It is advisable to have this designed by an Engineer.
Wall construction
The baskets come as a ‘flat pack’ and need to be opened up and corners tied together. Gabion tie wire is supplied, however, when doing large amounts, the supplier can hire to you a pneumatic clipping gun which applies a 40mm type ‘hog ring’, and it is certainly a lot faster. The welded mesh baskets come with a wire spiral, which are turned onto each corner, a simple and effective system.
When placing the baskets on the foundation, and the height is also obviously predetermined, therefore the base basket width is known.
If wider than 1.0m, place the base baskets crossways, which is necessary for the integral construction strength. Also, when baskets are placed, apply ties to tie them together.
Rocks
The infill rocks are classed at quarries as gabion rock, which are generally 100mm to 150mm, and most quarries stock this product. It is important not to have too many small rocks among the product.
The baskets each have 1.0m x 1.0m cells and prior to rocks being loaded in each cell, cross wires are attached with four in each cell, two at a third of the way up and two at two thirds up. These are to stop the baskets from bulging.
When the rock is loaded into the baskets, care must be taken not to drop from too high, and must only be trickled in a bit at a time. Once a small amount is in the basket, it is all then hand placed with larger rocks to the face and smaller rocks filling cavities. Too many people think you just fill the basket up using an excavator. It is a very mundane and labour-intensive job.
Once the basket is full, the lid is tied on and the top of the baskets tied together, with the next layer of baskets tied on and the process repeated again.
It is important to keep the baskets face as square and flat as possible, even though it is a basket full of rocks and it will never be an oil painting; we need to make it presentable. There have been other ways of giving a better presentation, by using smooth river stones, or behind the front mesh of the basket, placing paving slabs.
With back filling, drainage metal is very seldom used as the baskets themselves are free draining, however, it is common to place filter cloth behind to stop silt infiltration into and through the baskets.
Segmental Wall
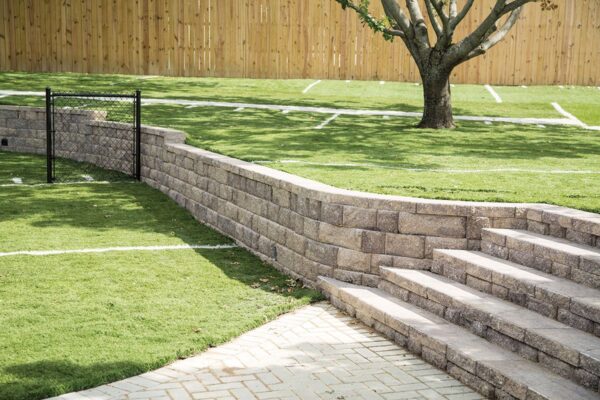
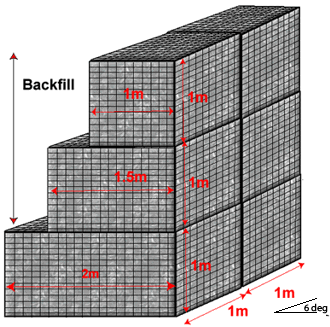
Segmental retaining walls are modular block retaining walls used for vertical change applications.
The two most common products used for this type of wall are:
- Keystone Block
- Allan Block
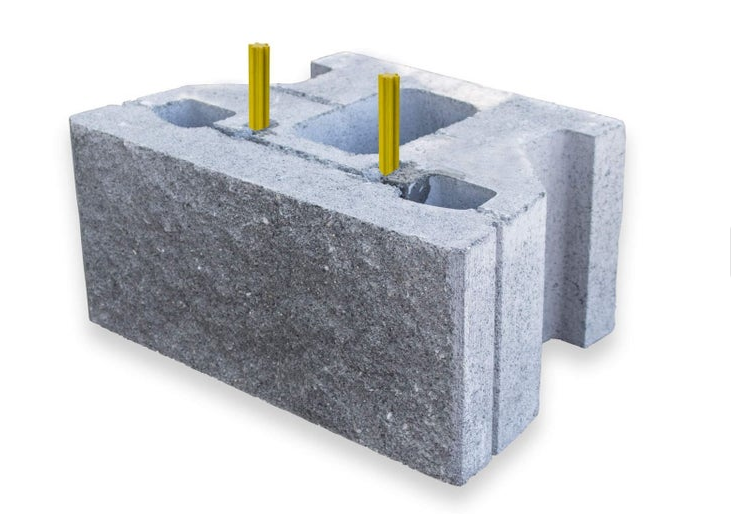
The only major difference between these two blocks is their individual locking system.
The keystone block connects with two fibreglass pins in each block, whereas, the Allan block is placed up against a vertical lip on the front of the lower block. Both blocks have a slightly different face width. Allan block at 435mm and Keystone at 455mm, and have a similar height of 200mm. They also both have corner blocks and capping blocks with the latter being 100mm high plus a huge range of face textures and colours.
Construction
Footings are an integral and very important aspect of the construction of a segmental wall. I say this because:
- Footings need to be exact in level and to have a smooth surface without any undulations.
- Steps to be exact to 200mm.
- Any unevenness will be evident in each course of blocks laid, therefore, the time spent on the footing finish is paramount.
- Believe you me, the extra time spent on this certainly speeds up the placing of blocks
The depth of the top of the footing needs to be approximately 100mm below finished ground level at the front of the wall at the lowest point.
There are two main types of footing:
- Compacted hard fill
- Concrete
I prefer the latter. Footing depth is 150mm with compacted Gap 40 or Gap 20 and finishing off with a Gap 7 levelling course. The width is generally 600mm. It is best to use boxing on each side of the footing and lasering it to the exact level using plenty of pegs. If there is any soft or unsuitable areas, these must be removed and filled with well compacted hardfill. Being a mass gravity wall, there is in excess of 400kg per lineal metre of wall for every 1.0m in height. I prefer a concrete footing and this is achieved by 100mm compacted hard fill with a 50mm layer of concrete on top.
Placing blocks
The principles for laying both types of blocks are much the same, be it quite a physical and you could call it, ‘back breaking’ work with blocks weighing around 34kg each and it doesn’t really work with two people lifting a block.
With the bottom course, it needs to be positioned so that it is where it should be in relation to boundary pegs, etc. There is room for movement with a 600mm wide footing. The best place for a string line is across the back of the blocks, as the face is often textured and not straight.
Once each course is placed, the voids need to be filled with a drainage aggregate. If up against an excavated face, drain-coil is placed at the base of the wall and drainage aggregate brought up behind the blocks as the wall increases in height. At the top, a capping block is glued down, but for the glue to work, the blocks must be dry.
With curves, which do look very appealing, blocks need to be carefully cut with a diamond blade saw to create smooth joins.
Tie backs
Segmental walls can only be constructed to a height of 900mm standing on their own. Beyond that height, a tie-back system is required, by means of Tensar Geogrid placed between the blocks running horizontally behind the wall. Depending on wall height, these can be placed on every second course and increased in spacing further up the wall, and can be up to 10m behind the wall. The benefit with a segmental wall, you could say the ‘sky is the limit’. We have done one at 10.0m high.
The backfill material is either compacted clay, or what is more popular, is hard fill.
In the case with geogrids, a vertical drainage blanket is placed behind the grids with the base drain-coil having connecting lines to the base drain-coil directly behind the wall.
Walls of this complexity are always best to be designed by an Engineer, as they also require building consent.
I will say here, you can never over drainage a retaining wall! The cost is a very small percentage of the total wall cost.
Article provided by Nick Liefting
Nick Liefting Contractors Ltd
nlcontractors.co.nz
![]()
Published in the Training & Events Section in WIRED Issue 70 / September 2023 by Fencing Contractors NZ
Read WIRED online
Follow us on Facebook
© Fencing Contractors Association NZ (FCANZ)
Read the other articles here: